Making a New Mostly Native Plant Hellstrip Garden Part 2
Why hello. Back at it again. I am digging out holes today and planting the allium purple sensation and daffodil replete. These are what my holes are looking like. Got them all over the place.
Let me show you my little tool and how I’m going about this. The allium holes only need to be about four to six inches deep. And the daffodil holes only need to be about three inches deep or so. So I have this garden knife. It only gets like four inches deep. So it has little circles with the inches on there. But I like it because it works pretty good as far as I’m concerned. All I do is take it, hold it upright like this, perpendicular to the earth and just press down. You can bend it back and forth if you want. If you can. Just keep doing it. Keep going in a circle. Whatever you’re trying to cut out, however, you want to cut it out. But for me, I’m doing circles.
I only intend on putting about three bulbs in each hole. So according to the pack, let’s see, for the allium, it says you can put ten bulbs per square foot. As far as the daffodils are concerned, it says you can put five bulbs per square foot. But I’m only doing three in each one. And this is about maybe five inches in diameter is what I’m cutting out. I have not been measuring it. I’m pretty used to doing this, and I generally don’t measure it. And I’m not going to measure it. But that’s it.
And then I just go by hand and scoop out the dirt like so. Set it aside. If there’s more dirt to be gotten, then I just go back in with my garden knife and I will cut it out as so. It doesn’t require a lot of effort or brawn. So that’s pretty good. I used to use a trowel. I like this much better. And this takes less, a lot less effort on my part to do it this way.
So that’s what that looks like. And I do have somewhat of a design going on. If you have not watched the previous video, do so. Check it out. This is video two. But I’ve planted this alongside bluestem, little bluestem, which is a repeating border plant in this flower bed. I’ve got the allium. I plan on putting the allium on the outer sides of the little bluestem. This little section where it kind of goes up like that. I’m going to put the daffodils closest to the house outside and one in the middle. So it’ll be like three right there and on the outer part, edges toward the front, they’ll be allium. So if you can imagine that going alongside this bed in the spring.
Now, the daffodils, if you’re not familiar, those leaves die back to the ground. So the allium will stay kind of upright for a lot of the summer if you let it, which I usually do. But what is going to end up happening is this little bluestem is going to fill out. You can see how close I have it to where the little bluestem is. So in the spring it’ll probably look just like that, tiny little and you won’t be able to see that much. In the meantime, the allium will be shooting up looking beautiful in the spring. And then as that little bluestem fills out, it’s going to cover up that allium stem, stalk, whatever you call it. Not sure of the name, and it’ll cover that up. But even when the blooms are done, in my opinion, they still look beautiful. They look like circles, like, like if you can imagine, like balls in a solar system. But yeah, so that’s what we’re doing today. All right. Check back in with you.
Okay, so I’m ready to put the bulbs in. Just want to give you a little shot on how I do that. I’m putting in some organic bone meal at the bottom. There’s not a lot at all. And I personally don’t think it’s necessary, but I have some. And as far as I’m concerned, everything in gardening is an experiment. So let’s see how this works, because I’ve never used it with bulbs before. I generally just put the bulbs in the earth and let it do its thing. It knows what to do.
But I’m putting in allium bulbs. This is what that looks like. So this bottom part, well, this is the bottom. How about that? Where you see all the little scragglies which, are just cut roots. That goes at the bottom. This is going to go at the top. It kind of looks like it has that, but it doesn’t. If you look, they may have like a little point on them like that. So you just place them in here like this. And I’m just going to stick three in there. One, two, three. Then go ahead and cover that up. And then I will top it with some organic humus and manure that I picked up from Home Depot. That’s my favorite brand to use. And not because I’ve done some tests and think it works better than everywhere else. It’s just because it’s $1.97 for a 40lb bag. And so I’ll just throw that on top. A little bit of compost and manure and that’s that.
And I’ll show you what the daffodil bulb looks like. We’re going to use the same technique here. So we’ll go with the bone meal first. I picked it up in my hand this time and just sprinkled some in the bottom. This is what a daffodil bulb looks like. This part is the top where it’s sticking up. This is the bottom. So we’ll put it in like this. One, two, three. Throw that dirt on there. I did see one kind of lean over and I don’t care. It’ll figure it out. It lives outside. Bam. On top, I’ll put some compost and some manure. Two handfuls of that. That’s just what I do and I don’t usually count. And then that’s that.
And I’ll go ahead and finish the rest of these holes up. After that, I’m going to take a trip to Home Depot and pick up some wire and some grommet. That was probably the wrong name, but whatever. That’s the word I’m going to use for today. But what I’m thinking is, my idea is that where I did the little makeshift fence with twine, the twine has come off. I don’t know if an animal pulled it off or it just came off, whatever the case may be. I want to use wire instead because I do want to keep these up over the winter until this garden bed at least has some flowers coming up.
I’ve used these stakes before. The stakes I got from Lowe’s. And what I have noticed, and it’s probably because I can’t get it into the ground deep enough just because of my strength, it doesn’t allow me to. But I just take this with a mallet and pound it in. And over the winter, you know, with the freeze-thaw cycle, you know, I am in northeast Ohio again. It does get pretty cold in the winter. So and I don’t, like I said, I’m not tamping it into the earth that deep. So it’s probably the freeze-thaw cycle that makes it come out of the earth. But when I see it, if it’s a warm enough day, I’ll come out and just mallet it back in. But so that’s what’s next. See you soon.
Okay, so next we’re going to just water these bulbs in. I’ve got my handy dandy sprayer on my hose. Just water it in like so. Nothing fancy. Nothing excessive, but just enough to get it situated in there and get that soil nice and firm around the bulb. Alright. I’m going to continue this on all of them. And again, I’m going to go to Home Depot. Pick up some wire for my little makeshift fence. Alright, see ya in a second.
Hello there. Let’s talk about updates. So I decided to replace the twine on my temporary makeshift fence with some wire. I bought some spools from Home Depot. It’s $5.98 for a 100-foot spool pack. But this is what we got so far. I’ve got the compost down on the portion of the flower bed that I’ve dug up completely. And I’ve started planting some other plants in addition to the little bluestem.
I picked up some aster that are pretty small. They only get about 18 to 24 inches tall and wide from Lowe’s. I visited my favorite section in there, the almost dead plant section. These were only four bucks and I put some over there. I bought a lot. Well, not a lot. I don’t think it’s a lot. I bought six. But antywho, they’re great plants native to a lot of places in America. But in Ohio where I am, they’re native and they’re fall blooming. You can see a lot of those blooms are spent already and I don’t care. But these are great plants and I don’t care if they’re almost dead. They’re going to come back to life. They’re going to thrive, they’re going to be beautiful, and hopefully, we’ll collect some seeds and plant them in all kinds of places.
I really like that they are this short. But antywho, I haven’t planted anything in front of here. But I did plant some slender mountain mint along the front edge of this. They are in groupings of two. This one looks like it’s almost dead but it isn’t. It has green. That means it’s alive. And look at those little baby leaves. This is going to do just fine. I have all the faith in the world.
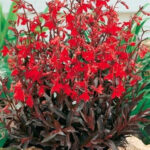
And these too. I planted red cardinal flower in groups of threes. Let’s see, that looks all tattered and terrible. That’s actually two of them. But it isn’t dead. And I have all the faith in the world. We’re in fall. There is enough time for this to develop a nice root system. But that’s like two also. I planted these all from seed last winter. So they’ll have a chance to thrive.
Looks like we have some grass still trying to grow. I’ll pull those out at will. And so that pattern just repeats. Once again, If you haven’t seen the first video, these little bluestems are spaced out every 74 inches or so. It’s going to wind up giving me a three-foot spacing in between. And also around the edge, I’ve also planted some daffodil replete and also some allium purple sensation bulbs. So that way it’s going to look pretty beautiful in the spring. So you just got to come back.
Here is a slender mountain mint that has a lot more leaves on it. You know, it looks a little more lively than the other one. But that’s what it looks like right now. And those are grown from seeds also. And there is more red cardinal flower. So you can see what they look like as seedlings.
That has been one thing that has been difficult on my journey in planting stuff from seeds is that it’s hard to tell what this stuff is. I even have an app and that app is like wrong a lot. But my advice is if you’re not sure what it is, just wait. And once it goes to flower or once it gets a little more mature, it’ll be a lot easier to decipher what that is.
But this is what we got so far. I’ve even straightened it out somewhat. So, happy so far. Today I’m going to go ahead and cut out the rest of it up unto that side door. See you soon.
All right, good people. I do want to share a tip that I haven’t so far as I proceed with phase two, if you will, of this project. But where I’m getting my edges at the end of the walk path I want to keep. What I’m doing is I’m going in at an angle. It’s not 45 by any means, maybe about a 30-degree angle with the shovel, kicking it in this way and following that with another one this way on the other side of it. But I’m basically beginning with just standing on the shovel, using my weight to go down into the grass. It’s rare that I have to actually jump, but sometimes you do. You might hit a hard spot.
And I’ve got clay soil. So to me, you know, that being said, if I were to guess, I would say this is probably the most dense soil. It is not hard to dig this up at all. So you’re just using your body weight to dig it for the most part. But after you get that first line, get your outline going, and come back along that path. Just kick it. It usually takes just one kick of one foot for me to just kind of shove that shovel in this way. And I’ll follow it all around that edge and then come back on the other side, do the same thing, rip that out. It’s disconnected once you do that. Take that strip of grass out and it ends up making it easier to come back and get these other strips of grass.
I already started doing that here. Hey, how you doing? Okay. But yeah, I started this already, just standing on it, walking in the line and getting that lined out. And I’ll go back with the other technique, which is really just wiggling that shovel underneath and sliding it forward. And that shovel does the work for the most part for you.
But doing that little trench serves me two ways. It makes it easier to get the rest of it out. And it also is satisfying for me because I can see the progress and I can see what that path is actually going to end up looking like. And it just makes me feel like I’ve completed something, even though I have. But it really puts that vision into work and into action. So I’ll check back with you. Bye.
I put my daffodil replete in here, like so. Three bulbs at a time spaced approximately one, two, three feet apart or so. I’m going along the middle here and it goes all the way till we get to this little tiny section here. Not sure what I want to do with that, but we’ll figure it out.
But yeah, the next step is going to be to cover that soil up, throw some compost and mulch on the top, water it in, and I will go ahead and throw some more mulch on top of this. I do like shredded mulch. I don’t know if I said that in my first video or not. Just because I like the way it breaks down quicker into the soil and starts helping my soil quicker. Puts some microorganisms in there. Some living matter, which is beautiful for plants.
But I did decide to go ahead and throw some leftover bulbs. Well, the remaining, they’re not really leftover, but there. And I threw some more of the almost dead section Asters I got from Lowe’s in the surrounding bed that was already existing. So our pathway is in and we’ve got form. So now it’s all about completing it.
But I can see my vision coming together. I don’t know if I’ll get to that other end this year. We’re going to keep going though. Because the plan is to get rid of all of this perimeter. Not just some of it, all of it. The only exception is going to be this walk path. And that is it.
All right, good folks, I’ll be back. Bye.
This is where we are. We got, I would say, two-thirds done at this point. We got all of this done. You got it going it’s looking so good. Thank you. I love watching it grow. Thank you. I’m sitting here trying to figure out how I’m going to handle this part. But we’ll see. We’ll see how it turns out. Stay tuned. Yeah. You did a good job on that side. Thank you. Bye. Bye. All right, now. I got the okay from the neighbors, but we got to do this half now. But that’s what it’s looking like so far on that side. This is again, the walkway that is going to lead up to this side door. I want to be able to go around this tree, or bush. I did line out a kind of guide for me to cut out where I would like the path to go.
One thing I would say about these types of projects, any type of project is really, just start. Don’t be afraid. You can’t finish unless you start. My thing is, if I don’t like it, then I’ll change it. And if I’m too tired to do it this year, then hopefully I will be alive next year and I’ll do it then. And if not, I won’t know anyway. So it’s a win-win all the way around.
But this is where we are. We got asters planted. Those get about 18 to 24 inches tall and wide. And I did go in on this section and plant some daffodils. There are three bulbs in every little dark spot you see. I didn’t plant any allium on this side. I’m not sure if I want to. I’m thinking I’ll do it like sections. It’ll be consistent across because there’ll be daffodils on the whole section in the spring. And then there’s also the Asters there then we’ll have Asters here for fall. So there will be continuity. There will be a rhythm to this. That doesn’t mean everything has to be matchy-matchy matchy for it to still match. But this is where we are. So, all right. Be back soon, bye.
Well hello there. I’ve got a pathway cut out. This is what you’re seeing. I envision this being an extended part of this garden. But over here, look at that. I got my pathway going. So hopefully you can see the vision better now. I’m going to be taking those stones and making a pathway here. And then we’ll finish cutting out the rest of that yard. But for right now, this part has gotten me so excited that I just want to do the pathway right now. So I’m off to get some materials.
Be back soon. Bye!
Plants Used During the Project
-
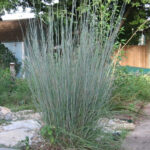
- Schizachyrium scoparium
-
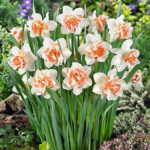
- Daffodil replete
-
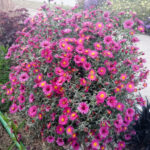
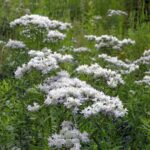
- U.S. native plant Symphyotrichum novi belgii hazy dark pink
-
- U.S. native plant Pycnanthemum tenuifolium
-
- U.S. native plant Lobelia cardinalis
John Upchurch