Making a New Mostly Native Plant Hellstrip Garden.
Part 3
Welcome to video three. That means I am finally done. I hope you like the video. If you do, don’t forget to hit that like and subscribe button.
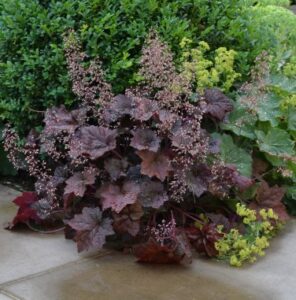
Okay, here we are again. This is what we’ve got so far. I got this edged out nice and beautifully. I went ahead and I picked up a couple more plants from Home Depot. These are on sale right now for half off. We got coral bells palace purple, AKA heuchera, and they are native to the U.S., which is excellent. They attract hummingbirds. They are semi-evergreen. There’s a bunch of different nativars available in different colors, but they get these little inconspicuous flowers that shoot up and they attract hummingbirds, believe it or not. So I got three of those for the edge there.
And I also picked up more of these, which are rose verbena homestead purple. They’ll look like this picture when they’re not scrawny, but clearly, they have not been cared for properly at Home Depot. But this is another native plant. It’s going to be beautiful once they get into the ground and get a taste of the earth. I broke a piece off by mistake. I’m going to put that into the ground and see if it grows. Fingers crossed. We’ll see. And if it does, I’ll never buy another one of these again. They will be propagated from this moment forward.
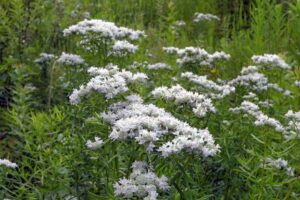
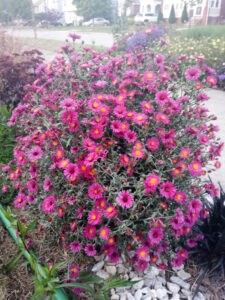
And I also pulled out a couple of bee balm that I had in a pot. These are this bubblegum color when they are in bloom. There’s a bunch of seeds and I’m going to see if I can collect some too, but I’m thinking I’ll put those there. I may go ahead and repeat some aster. Hazy aster is the cultivar or nativar. They only get 18 to 24 inches wide and tall. If you watch the other videos, you know, I put them in a bunch of other places right here. That’s a little tiny version over there. But thanks to my dad, he picked me up two more and I have one more in a pot that I can get and put maybe three across here.
But we’ve got the pavers in. So I dug them all out and put them all in and I am trying a new technique this time. I’ve built two different pathways at this home so far, and this is the first time I’m using this technique. So I didn’t hardly dig… well, I dug, but it was only maybe about… it was measuring five inches deep on that side and seven inches deep on this side, which clearly, you know, I have a slope in this yard already. So but these pavers are like two inches tall. So but what I did was I got some crushed stone and some sand, and I got these paver boards. I think that’s what they’re called. The claim on the paver boards is that they replace five bags of crushed stone. So I went ahead and tried it not because I think that it’s going to save me money, but because it was going to save me effort and time. So I got to do the math and see if that actually saved me money or not. But I’m pleased. They were $12.97 apiece. That was kind of pricey to me. I used five of them going across. This is what they look like by themselves.
The directions said, I believe, and I’ll post it on the screen if this is incorrect, but it’s just that you just put it right on top of the earth, which is beautiful. What I do is tamp it down first before I do anything. Looking for my tamper. I don’t see it. What did I do with it? Okay, well, I see it now. All right. So I use the tamper, which is this thing there. And I tamp the earth down after I dig it up, which you saw in the previous video what this looked like when I dug it up. The directions said just put it right down on the earth after that and then put a thin layer of sand. However, because I’m on a slope and I’ve already dug this grass up and I felt like it was kind of soft, even with me tamping it down. And on top of that it was sloped. I did put some crushed stone first before I put the sand. Then I put the paver board on top and then I had to meticulously place all these stones. It was difficult trying to get it to fit and look right, but I finally got it together. I’m pleased. These are definitely not the same thickness, so I will have to contend with that. So we’ll see how that comes out as far as safety is concerned. So I am concerned a little bit about this being a trip hazard, but all right.
So next thing we’re going to do is put some more crushed stone around these edges. And you can also see I put landscape fabric down first. I used landscape stakes to hold those down. But so I bought these edgers which, you know, everything costs more right now. I bought these last year. They were $9.99. This year they’re $14.97. That is a steep increase percentage-wise. But I bought three of these. So they get how wide are these? Excuse me, they are, buddabuddubuddabudda, six feet. So that’s going to give me 18 feet worth. I did do a rough estimate of how long this section is, and I came up with about 16 feet. I did not measure. I just walked it. So we’ll see. Hopefully, that’s a little too much, which will be great. I have wire nippers that I’m going to use to cut this as much as I need to. And I also bought some …. landscape spikes I think. I’ll put it on the screen. Let’s see, I think I have it in my wheelbarrow. I got that wheelbarrow from my Paah. He got it at a garage sale. He used to laugh at this one and he bought me this one. I have to say this is the first time that I’ve used this since he bought me this one. But this one is so much nicer. It has hydraulic wheels and it just bounces effortlessly over steps and humps. It’s way easier to use, but antyway. So they’re anchoring spikes. That’s what they are. So I got 24 of those and boy, did they raise the price on that too. So we’re going to get started with that. After that, I’m going to pour a bunch of patio/paver sand into those nooks and crannies. And then I’m also going to go ahead and put some pea pebbles in there as well in those nooks and crannies.
Now, the other walkway that I did, I put the paving edgers on both outer parts. But this time I am not. I’m definitely cutting corners. And at the end of where this flower bed is, I’m going to just put some pebbles and also some crushed stone like in this section where there’s a lot more cut out. And what that’s going to do is to help this to stay in place through the winter freeze-thaw cycle where the earth heaves, which is, you know, just expanding and contracting. So this is where we are. I still have not cut up this section of the grass, but this just made me happy to complete this section. Well, I’m not done yet, but to have that done, I think that looks amazing. So now we’re going to go in with that. It is kind of making this kind of more obvious of how bad this section is, but this walkway was here when I bought the house and whoever put this in just put it directly over the soil and it is definitely collapsing and moving all kinds of different ways. So we’ll see how that works, this new technique I’m using. But that’s where we are. I’ll be back.
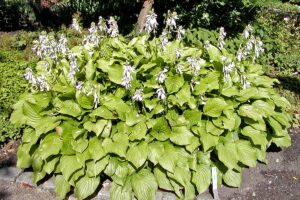
It’s all dug out. It’s all ready for me to start planting. I had a neighbor come by earlier and she is picking up all of these daylilies and hostas. They might look a little crispy and crunchy, but they are not dead. And she’s going to use them in her yard. So she’ll be coming back to get those. There were some planted here that we got out. This bed closest to the fence will be a little bit closer to ready for me to start planting next year. Next year the plan for this bed is to dig up the bulbs that are in there. There are Spanish bluebells, which are not native. I’m going to be removing those. There are also daffodils, which I would like to keep. And then there are also tulips, which I would like to keep, but I would like them to go behind the fence because I do not want to leave any deer candy, which is what tulips are on the outside. But this is prepared and I’m here for it. So today, I will start planting this bed up with some spring bulbs: the alliums and the daffodil replete. This part of that walkway, which I re-did I’m fairly pleased with. It is making it stand out on this side that side is not redone, but I don’t have the energy this year to do it, so I might do the other half of that walkway next year. But this is ready to go. I’m very pleased with the layout and the curvature of that, and I like that this bed is a lot bigger now under this hydrangea bush.
So I did add a couple more things since the last video or the last piece of this video, which are basically some sedums that an animal must’ve stepped on and they broke off of my sedums that are in the front of my house. So I just dug a hole popped them in. They say that these are fairly easy to propagate, that we just pop them in the earth and they will grow. So we’re going to get some more hazy aster. I don’t know if you can see that, but more repeating hazy aster right here. So I’ve only got two of those and now we’re going to start planting. See ya soon.
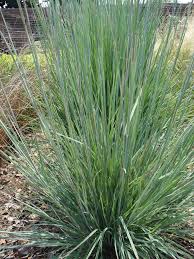
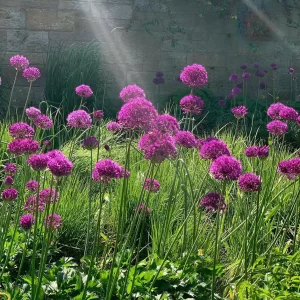
We’re almost done. Got most of the bulbs planted. I ran out of daffodils, so I’ll have to go to the store to get those. But I’m going to repeat the same basic pattern that I did in that first section on video one. If you haven’t seen that yet, please watch it. But we’re starting off here with the Allium Purple Sensation. We’ve got three groups of daffodil replete there, and we’re going to repeat that with some more allium purple sensation. Three groups of the daffodil replete. And this is where my little bluestem is starting on this side. Now, I did space, these little bluestem out 72 inches apart instead of 74, like the first section. But as you can see, we’ve got extra holes here. That’s a section of daffodil replete I want planted. But the same way I did on the first section, I’ve got that allium purple sensation right next to that little bluestem. For the little shorter section, I’m going to do just daffodils here. And I will come up with what I’m going to do as far as plants that will grow during the summer and the fall later. I haven’t yet really made my mind up on that. So it looks like we’re going to Home Depot again and I will pick up my last bag of daffodils and then I will start going in and covering this up.
This section of grass is well, the section of dirt, I should say, is a lot different from the soil in the first two sections. This soil was extremely rocky and sandy and it was very difficult to dig in. So I take back what I said about clay. This rocky soil is much harder and because of that, the further I got, the less deep I could dig. So these sections where it is shallow, I’m just going to build the soil up around it with some topsoil to compensate for the fact that I couldn’t dig that deep. And this is the topsoil I got. Do I think it’s better than any other one? I have no idea. I just buy it because it’s the cheapest. So get to you soon. Bye.
And now it’s time for the final reveal. We’re all finished a month and three days later. Today is October 4th. It is unusually warm. It was 84 degrees today. That’s crazy. And I love it. But this is all done. I forgot to mention I did put some liatris over here right next to this carex. It seems as we have quite a bit of either grub damage or some type of fungus on this grass, which I’m not too concerned with. I’m trying to get rid of it anyway.
But for those of you that did not see the first two videos, our staple plant is little bluestem. We’re going to have three-foot gaps in between each. We’ve got slender mountain mint in here. We’ve got red cardinal flower. We get to our little section here and we’ve got asters. We’re going to have spring bulbs coming up. We’ve got daffodils. We’ve got allium. And I’m done. There are some more aster. And this is the third and final section. And it did prove to be my favorite part.
Let me just show you the view that I keep coming out and looking at. Check this out. I love it. I love it. And I know the neighbors think I’m weird coming out here just staring at it. But it’s so pretty. But look what I got. I put some coral bells on the edge there. We’re going to have some gaps and that is fine. I will be thinking about what I’m going to plant as a ground covering or multiple ground coverings in here over the winter. We still have the hosta that we started off with. We’ve still got our hydrangea bush. But I’ve also added in some rose verbena which if you’ve seen my other videos, you know, I have that spotted around the yard.
This is how the path came out. I put some rose verbena there. I don’t know if I’ll change that, but I do want something that is going to keep that soil in place. If you have any suggestions, put it in the comments and just know I’m doing native. This is a mostly native garden, so I only want to do native plants when possible. But this is the final project. I put some pebbles on the side. I got my sand filled in the cracks and in this bed.
I did repeat some of the things. I have little bluestem again. I spaced that out about the same as the first bed. They’re going to have three feet spacing. I’ve got daffodil replete in here. I’ve got allium purple sensation. A neighbor came by and she took the daylilies. And I’m happy because I don’t want them. And all I’m left with is my Sky Holly pencils that that I put I think I put these here last year but these will get about ten feet tall, 2 to 3 feet wide and hopefully give me a little bit of privacy in the back. It’s going to take way too long to grow. So I will be building a privacy screen up there. So stay tuned for that. But this is it. I put some rattlesnake master in here, which is this. See, we’ve got these pretty leaves falling. That’s the rattlesnake master. And I also did Penstemon Dark Towers here, too. I have seven in a row. They’re tiny only because I had them in a pot. These were also grown from seed last winter. The rattlesnake master and the penstemon. But this is what happens when you leave them in a pot and you don’t take them out so they can thrive. They just stay all scrawny. I’m lucky that they did okay, but this is it.
I’m going to get one more view for you so you can take this all in and so I can take it in with you. This is the view. And I would say if you want to start a project, like I said before, you’re not going to finish if you don’t start, just do it. I don’t have everything done and at the end of the day, I’m probably going to be making changes anyway until I die or sell this house anyway. I don’t have everything thought out like I said, but there are enough spring plants planted where this is going to look beautiful in spring and complete and give me a little bit more time to think about this over the winter, plant some more plants, buy seeds, and when spring comes, hopefully, you’ll join me and we’ll fill these beds up. This is it and I’m going to end it with my favorite view. Stay inspired. Hopefully, this will inspire you to make some changes that you’ve been wanting to make in your garden. Thanks for watching!
U.S. Native Plant List
Every native plant used in this hellstrip garden bed is drought-tolerant, deer-tolerant, rabbit-tolerant, salt-tolerant, and juglone-tolerant. The list below displays the plant’s scientific name followed by its common name/s.
-
- Eryngium yuccifolium
-
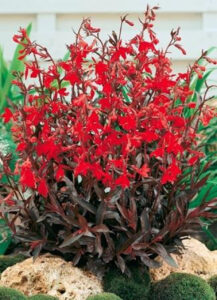
- U.S. native plant Lobelia cardinalis
-
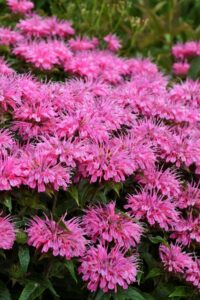
- Monarda bubblegum blast pink bee balm
-
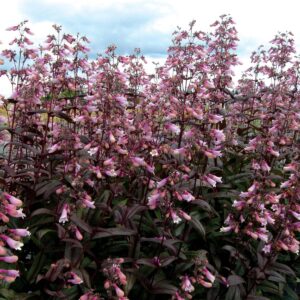
- Penstemon Digitalis ‘Dark Towers
-
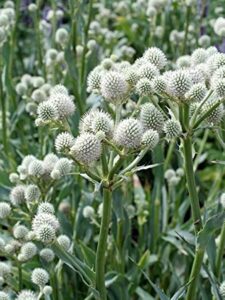
- U.S. native plant Pycnanthemum tenuifolium
-
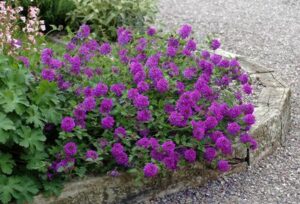
- Verbena canadensis ‘Homestead purple
-
- U.S. native plant Symphyotrichum novi belgii hazy dark pink
-
- Coral bells palace purple
- Penstemon Digitalis ‘Dark Towers/Penstemon Dark Towers
- Lobelia cardinalis/Red cardinal flower
- Pycnanthemum tenuifolium/Slender mountain mint
- Eryngium yuccifolium/Rattlesnake master
- Schizachyrium scoparium/Little bluestem
- Symphyotrichum novi-belgii ‘Hazy dark pink/New York aster Hazy Dark Pink
- Verbena canadensis ‘Homestead purple/Verbena ‘Homestead purple/Vervain
- Monarda didyma ‘Sugar Buzz Bubblegum Blast/Bee balm/Bergamot
Non-Native Hellstrip Plants Used
The non-native plants that were used already existed in the landscape. The plants were either moved, pre-existing in their current location, or were newly planted but previously used elsewhere in the garden.
-
- Allium hollandicum ‘Purple Sensation
-
- Hosta plantaginea
-
- Hosta sieboldiana
-
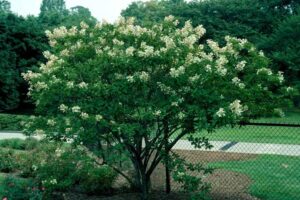
- Hydrangea paniculata
-
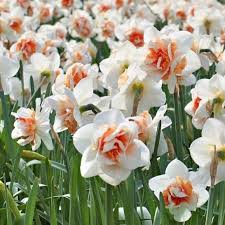
- Narcissus tazetta
-
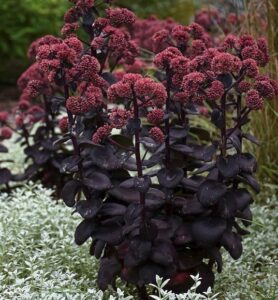
- Sedum ‘Night Embers
-
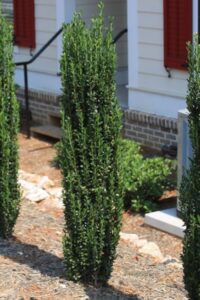
- Ilex crenata sky pencil
- Narcissus tazetta/Daffodil Replete
- Allium hollandicum/Allium ‘Purple Sensation’
- Hosta plantaginea/August Lily Hosta
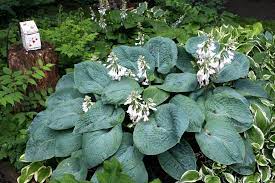
- Hosta sieboldiana/Siebold’s plantain lily
- Hydrangea paniculata/Peegee hydrangea
- Sedum ‘Night Embers’/Autumn Stonecrop ‘Night Embers
- Ilex crenata sky pencil/Sky pencil Japanese holly
PaverBase Installation
- Remove the grass and compact and level the ground using a tamper
- Lay landscape fabric (secure with garden staples) and spread 1/4″-1/2″ sand on top of the landscape fabric
- I laid crushed stone down first as well on this step in addition to the manufacturer’s instructions
- Place the paverbase panels and overlap the edges
- Trim the PaverBase where needed with a utility knife
- Lay the stones in the desired pattern
- Place the patio edgers on the outer sides of the walk path -secure with landscaping spikes every few holes – use snips to cut places where your walk path curves
- I only used the patio edgers along one edge of the walkway
- Sweep in patio/paver sands in the gaps
- I did not use polymeric joint sand. Polymeric joint sands prevent drainage and I want to allow draining.
Paver Base Materials List
The materials below were used to create a 16-foot walk path
- 5 Brock PaverBase boards
- (4) 40lb bags of patio/paver sand
- (3) 40lb bags of crushed stone
- (2) .5cu ft bags of pea gravel
- 3 ProFlex 6′ paver edging
- Vigpro Black Plastic-Nylon Anchoring Landscape Spikes (24 pack)
- Garden Staples
- Mallet
- Utility knife
- Pavers or natural stone
Richard Larson
Ricardo Paulsen